There’s a lot of articles about installing Oracle XE 18c on Docker. But Docker is not the only containerization technology on the market.
In this article, we are going to create Oracle XE 18c installation in Linux Containers (LXD)
A bit of history – LXC vs LXD
When we start our adventure with Linux Containers we might get confused by 2 different naming conventions – LXC and LXD. To clarify let’s talk about some history.
In the year 2000 FreeBSD developers introduced the jail command, which was used to isolate an application process from the main operating system space, but it was not very intuitive and functional.
Fortunately, it was not a waste of time, because 6 years later Google developers used the idea of isolation to introduce the new project – Control Groups (cgroups) – which was added to Linux kernel in version 2.6.24.
From here it was only one step to create Linux Containers (LXC) as a first containerization technology, which led to the birth of Docker in 2013.
Since Docker was far more intuitive in use than LXC but was used in a bit different philosophy (stateless containers), 2 years later LXD was born to give a new quality to Linux Containers
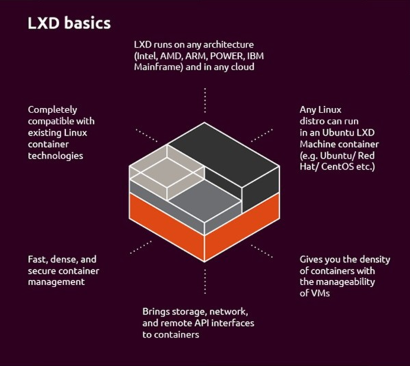
LXD isn’t a rewrite of LXC, in fact it’s building on top of LXC to provide a new, better user experience. Under the hood, LXD uses LXC through liblxc and its Go binding to create and manage the containers. It’s basically an alternative to LXC’s tools and distribution template system with the added features that come from being controllable over the network.
https://linuxcontainers.org/lxd/introduction/
SNAP
In order to install LXD, we have to have SNAP package manager – this is how to install it on OEL/CENTOS 8:
First, we have add the newest EPEL repository:
# dnf -y install https://dl.fedoraproject.org/pub/epel/epel-release-latest-8.noarch.rpm
Once we have it, we can install and configure SNAPD:
# dnf -y install snapd
# systemctl enable --now snapd.socket
# ln -s /var/lib/snapd/snap /snap
And install LXD
# setenforce 0
# snap install lxd
LXD configuration
Before configuring LXD it is a good idea to create a separate volume, which will be used as a default storage for new containers
[root@rick ~]# pvcreate /dev/sdb
  Physical volume "/dev/sdb" successfully created.
[root@rick ~]# vgcreate lxd-group /dev/sdb
  Volume group "lxd-group" successfully created
[root@rick ~]# lvcreate -ncontainers -l+100%FREE lxd-group
  Logical volume "containers" created.
Now we can configure LXD:
[root@rick ~]# lxd init
Would you like to use LXD clustering? (yes/no) [default=no]:
Do you want to configure a new storage pool? (yes/no) [default=yes]:
Name of the new storage pool [default=default]:
Name of the storage backend to use (btrfs, dir, lvm, ceph) [default=btrfs]:
Create a new BTRFS pool? (yes/no) [default=yes]:
Would you like to use an existing block device? (yes/no) [default=no]: yes
Path to the existing block device: /dev/lxd-group/containers
Would you like to connect to a MAAS server? (yes/no) [default=no]:
Would you like to create a new local network bridge? (yes/no) [default=yes]:
What should the new bridge be called? [default=lxdbr0]:
What IPv4 address should be used? (CIDR subnet notation, “auto” or “none”) [default=auto]:
What IPv6 address should be used? (CIDR subnet notation, “auto” or “none”) [default=auto]: none
Would you like LXD to be available over the network? (yes/no) [default=no]:
Would you like stale cached images to be updated automatically? (yes/no) [default=yes]
Would you like a YAML "lxd init" preseed to be printed? (yes/no) [default=no]:
Let’s create the first container!
[root@rick ~]# lxc launch images:oracle/7/amd64 mortyc-137
Done! We have a first container, named mortyc-137 based on OEL7! Let’s list our containers:
[root@rick ~]# lxc ls
+------------+---------+---------------------+------+-----------+-----------+
|    NAME    |  STATE  |        IPV4         | IPV6 |   TYPE    | SNAPSHOTS |
+------------+---------+---------------------+------+-----------+-----------+
| mortyc-137 | RUNNING | 10.94.183.27 (eth0) |      | CONTAINER | 0         |
+------------+---------+---------------------+------+-----------+-----------+
In order to install Oracle XE 18c, we need to prepare our container properly. By default, we have a NAT bridge attached to our container, which will allow access to the host network.
To login to your new container, just type:
# lxc exec morty-c137 bash
This is what we have to do:
- Configure yum repository: yum install -y oraclelinux-release-el7.x86_64
- Install Oracle RDBMS preinstall packet: yum install -y oracle-database-preinstall-18c.x86_64
- Comment out memlock soft and memlock hard from file /etc/security/limits.d/oracle-database-preinstall-18c.conf
- Install our XE 18c database: yum -y install https://download.oracle.com/otn-pub/otn_software/db-express/oracle-database-xe-18c-1.0-1.x86_64.rpm
- Our last step is of course standard XE configuration: /etc/init.d/oracle-xe-18c configure
That’s it! Let’s polish it 😉
Congratulations! Your first container with Oracle XE 18c is ready! To make it more usable, let’s create a new image for later use:
[root@rick ~]# lxc publish mortyc-137 --alias ol7-xe18c
Instance published with fingerprint: 9437d32ebbf5ff0aa512b24fbefd746d885b1002e08a9690654fde51e41465d3
[root@rick ~]# lxc image ls -clda
+------------+---------------------------------+--------------+
|   ALIAS    |           DESCRIPTION           | ARCHITECTURE |
+------------+---------------------------------+--------------+
| oel7-xe18c |                                 | x86_64       |
+------------+---------------------------------+--------------+
|            | Oracle 7 amd64 (20200524_08:03) | x86_64       |
+------------+---------------------------------+--------------+
|            | Oracle 8 amd64 (20200524_08:03) | x86_64       |
From now on we can create a new container much quicker
[root@rick ~]# lxc launch ol7-xe18c mortyc-1
Creating mortyc-1
Starting mortyc-1
To publish LISTENER port on our host, we just have to configure proxy device:
# lxc config device add mortyc-137 oralistener proxy connect=tcp:127.0.0.1:1539 listen=tcp:0.0.0.0:1539
Easy, right? Have fun! 🙂
https://www.oracle.com/database/technologies/virtualization-matrix.html