From time to time I get questions on my trainings, what is the difference between TRUNCATE TABLE and TRUNCATE TABLE DROP STORAGE… well, there is no difference because DROP STORAGE is default 😉
DROP STORAGE
Specify DROP STORAGE to deallocate all space from the deleted rows from the table except the space allocated by the MINEXTENTS parameter of the table. This space can subsequently be used by other objects in the tablespace. Oracle Database also sets the NEXT storage parameter to the size of the last extent removed from the segment in the truncation process. This setting, which is the default, is useful for small and medium-sized objects. The extent management in locally managed tablespace is very fast in these cases, so there is no need to reserve space.
Source: http://docs.oracle.com/database/122/SQLRF/TRUNCATE-TABLE.htm
But the most confusing part for most of the young DBAs and developers is the "DROP/REUSE STORAGE" clause itself – you have to understand, that truncate does not remove anything from the data files. Never. In both cases. The difference is how other objects behave in that tablespace. REUSE STORAGE means: "this is my private space and only I can reuse it".
You can use my ODBV tool to visualise it by yourself.
Here is an example:
Let’s create a simple tablespace and a table in it:
SQL> get tbs
  1  create tablespace truncate_test
  2  datafile '/u01/app/oracle/oradata/orcl/truncate_test.dbf' size 8m
  3  autoextend on next 8m
  4* maxsize 1g
SQL> /

Tablespace created.

SQL> conn hr/hr
Connected.
SQL> create table employees_truncate1 tablespace truncate_test
  2  as
  3  select *
  4  from employees;

Table created.

SQL> begin
  2    for i in 1..5 loop
  3      insert into employees_truncate1
  4      select *
  5      from employees_truncate1;
  6      commit;
  7    end loop;
  8  end;
  9  /

PL/SQL procedure successfully completed.

SQL> conn / as sysdba
Connected.
SQL> alter system checkpoint;

System altered.
Now we have to check the DATA_OBJECT_ID of this table in order to create ODBV parameter file, which will be used for visualisation:
SQL> ;
  1  select object_id, data_object_id, object_name
  2  from dba_objects
  3* where object_name like 'EMPLOYEES_TRUNC%'
SQL> /

 OBJECT_ID DATA_OBJECT_ID OBJECT_NAME
---------- -------------- ------------------------------
     94700	    94700 EMPLOYEES_TRUNCATE1
As you can see, at the beginning the OBJECT_ID and DATA_OBJECT_ID are the same. And as far as I know – OBJECT_ID can be never changed.
This is the visualisation of the table in the data file:

You can see that table has 37 regular blocks and 6 empty blocks.
Now let’s truncate our table and check OBJECT_ID and DATA_OBJECT_ID:
SQL> truncate table employees_truncate1 ;

Table truncated.

SQL> get obj
  1  select object_id, data_object_id, object_name
  2  from dba_objects
  3* where object_name like 'EMPLOYEES_TRUNC%'
SQL> /

 OBJECT_ID DATA_OBJECT_ID OBJECT_NAME
---------- -------------- ------------------------------
     94700	    94701 EMPLOYEES_TRUNCATE1
You can see, that DATA_OBJECT_ID has changed. Now I will create a new table in the same tablespace and fill it with some rows:
SQL> create table employees_truncate2 tablespace truncate_test
  2  as
  3  select *
  4  from employees;

Table created.

SQL> insert into employees_truncate2 select * from employees_truncate2;

107 rows created.

SQL> /

214 rows created.

SQL> /

428 rows created.

SQL> commit;

Commit complete.

SQL> conn / as sysdba
Connected.
SQL> alter system checkpoint;

System altered.

SQL> get obj
  1  select object_id, data_object_id, object_name
  2  from dba_objects
  3* where object_name like 'EMPLOYEES_TRUNC%'
SQL>
SQL> /

 OBJECT_ID DATA_OBJECT_ID OBJECT_NAME
---------- -------------- ------------------------------
     94700	    94701 EMPLOYEES_TRUNCATE1
     94702	    94702 EMPLOYEES_TRUNCATE2
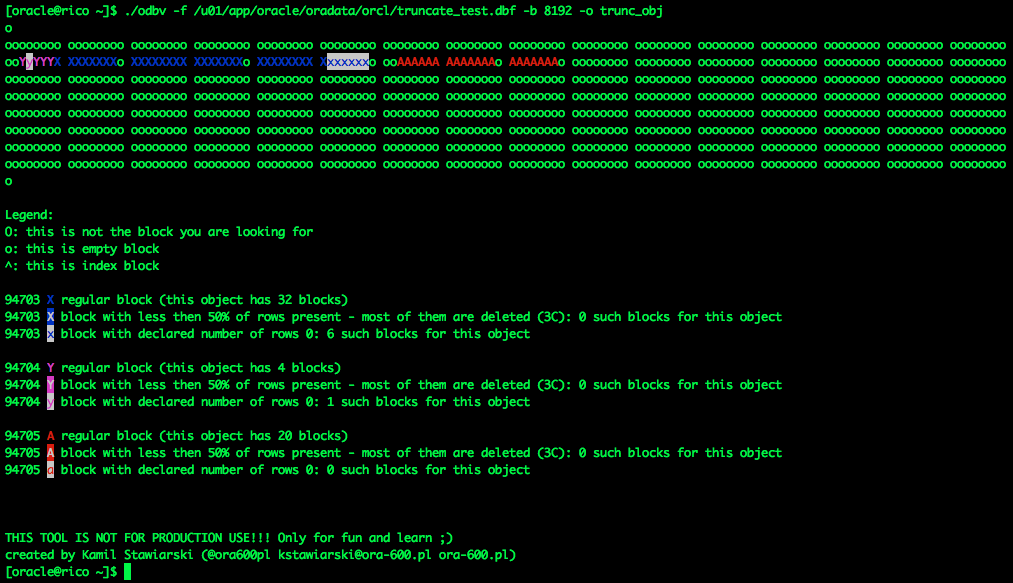
Based on the new values of DATA_OBJECT_ID, I will mark the "second instance" of the first table as Y and our new table as A.
This is the contents of the configuration file for ODBV:
[oracle@rico ~]$ cat trunc_obj
94700:X|BLUE
94701:Y|MAGENTA
94702:A|RED
And this is our visualisation:

As you can see, the second table started consuming the blocks, which belonged to the table before truncate. So part of the data from the first iteration is still there, but the blocks are marked as reusable for other objects in the same tablespace.
If I’ll insert some data to the first table, the new iteration with new DATA_OBJECT_ID will be also consuming those blocks:
SQL> conn hr/hr
Connected.
SQL> insert into employees_truncate1
  2  select *
  3  from employees;

107 rows created.

SQL> /

107 rows created.

SQL> /

107 rows created.

SQL> commit;

Commit complete.

SQL> conn / as sysdba
Connected.
SQL> alter system checkpoint;

System altered.

So after regular TRUNCATE TABLE (which is in fact: TRUNCATE TABLE DROP STORAGE), the data is not removed from the data files, but the blocks are simple marked to be reused by any segment in the same tablespace.
Now checkout the visualisation, when I repeat all above steps with only little alteration: I’ll use TRUNCATE TABLE RESUSE STORAGE instead of TRUNCATE TABLE:
Now we can see, that the second table is not allowed to consume truncated blocks of the first table. Those blocks are marked for reuse, but only for the original owner.
So to sum up: in both cases, truncate does not remove anything from the datafile. It only marks blocks as reusable – for everyone or for the original owner.